12-Lead ECG Placement: The Ultimate Guide
Electrocardiogram

As a non-invasive yet valuable diagnostic tool, the 12-lead ECG records the heart's electrical activity as waveforms.
With proper lead placement and interpretation, an ECG can detect and monitor a host of heart conditions - from arrhythmias to coronary heart disease to electrolyte imbalance.
Since the first telecardiogram recorded in 1903, huge strides have been made in the recording and interpretation of ECG. Today, the 12-Lead ECG remains a standard diagnostic tool among paramedics, EMTs, and hospital staff.
Contents
The 12-Lead ECG
A 12-lead ECG paints a complete picture of the heart's electrical activity by recording information through 12 different perspectives. Think of it as 12 different points of view of an object woven together to create a cohesive story - the ECG interpretation.

These 12 views are collected by placing electrodes or small, sticky patches on the chest (precordial), wrists, and ankles. These electrodes are connected to a machine that registers the heart's electrical activity.
Who Should Have a 12-Lead ECG
The main purpose of the 12-lead ECG is to screen patients for possible cardiac ischemia. It helps EMS and hospital staff quickly identify patients with STEMI (ST elevation myocardial infarction or in other words, heart attack) and perform appropriate medical intervention based on initial readings.
Chess (Precordial) Electrodes and Placement
Proper electrode placement is crucial to measure the heart's electrical activity accurately.
In a 12-lead ECG, there are 12 ECG leads calculated using 10 electrodes. These ECG electrodes provide the necessary data to compute the leads of the heart’s electrical activity.
Chest (Precordial) Electrodes and Placement

» V1 - Fourth intercostal space on the right sternum
» V2 - Fourth intercostal space at the left sternum
» V3 - Midway between placement of V2 and V4
» V4 - Fifth intercostal space at the midclavicular line
» V5 - Anterior axillary line on the same horizontal level as V4
» V6 - Mid-axillary line on the same horizontal level as V4 and V5
Limb (Extremity) Electrodes and Placement

» RA (Right Arm) - Anywhere between the right shoulder and right elbow
» RL (Right Leg) - Anywhere below the right torso and above the right ankle
» LA(Left Arm) - Anywhere between the left shoulder and the left elbow
» LL (Left Leg) - Anywhere below the left torso and above the left ankle
Additional notes on 12-lead ECG Placement:
- The limb leads can also be placed on the upper arms and thighs. However, your 12-lead ECG lead placement should be uniform. For instance, do not attach an electrode to the right wrist and one on the left upper arm.
- For female patients, place leads V3-V6 under the left breast.
- Do not use nipples as reference points in placing electrodes for both men and women, as nipple locations vary from one person to another.
The 12 Lead Groups

A lead is a glimpse of the electrical activity of the heart from a particular angle.
Put simply, a lead is a perspective. In a 12-lead ECG, there are 10 electrodes providing 12 perspectives of the heart's activity using different angles through two electrical planes, vertical and horizontal.
Vertical plane (Frontal Leads):
By using 4 limb electrodes, you get 6 frontal leads that provide information about the heart's vertical plane:
- Lead I
- Lead II
- Lead III
- Augmented Vector Right (aVR)
- Augmented Vector Left (aVL)
- Augmented vector foot (aVF)
Leads I, II, and III require a negative and positive electrode (bipolarity) for monitoring. On the other hand, the augmented leads aVR, aVL, and aVF are unipolar and require only a positive electrode for monitoring.
Einthoven's Triangle
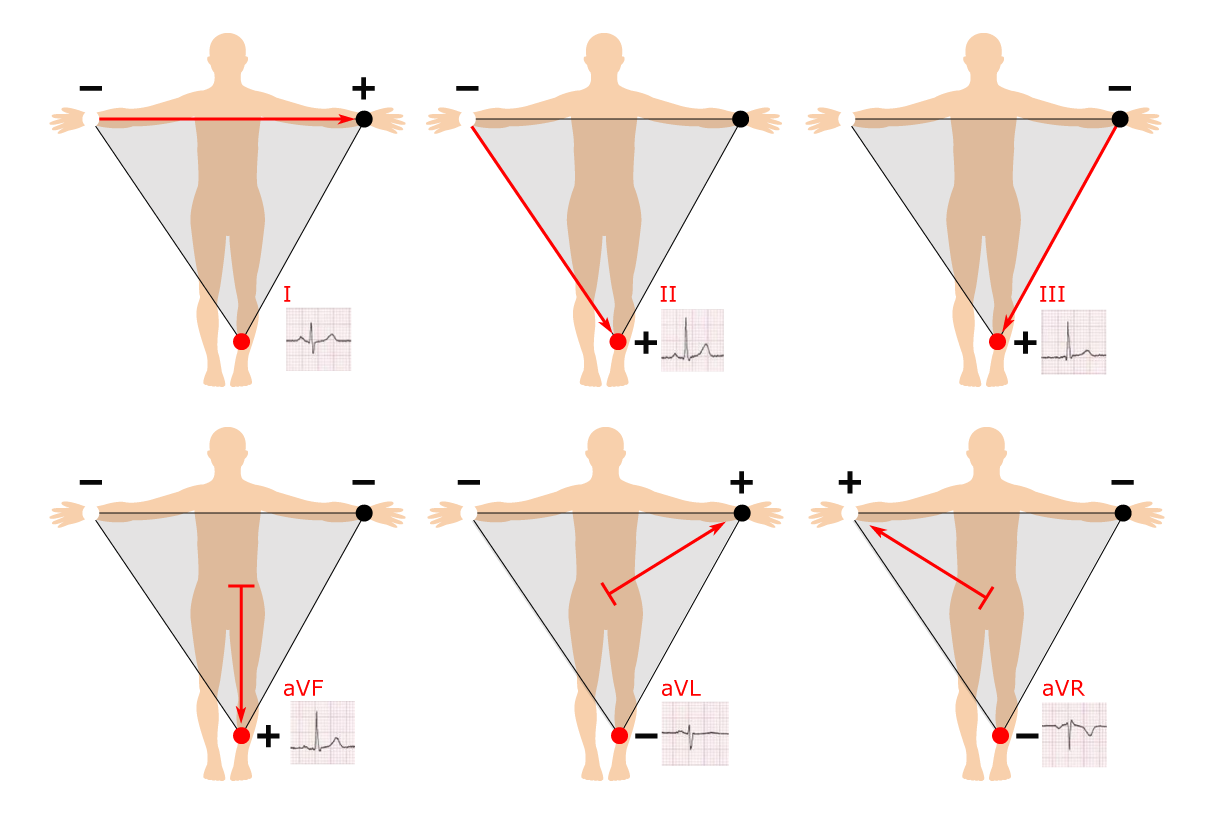
Einthoven's Triangle explains why there are 6 frontal leads when there are just 4 limb electrodes.
The principle behind Einthoven's triangle describes how electrodes RA, LA and LL do not only record the electrical activity of the heart in relation to themselves through the aVR, aVL and aVF leads. They also correspond with each other to form leads I (RA to LA), II (RA to LL) and III (LL to LA).
As a result, they form an equilateral triangle. Hence, it's called Einthoven's triangle, named after Willem Einthoven, who invented the first practical ECG.
Keep in mind that RL is neutral (also known as point zero, where the electrical current is measured). RL doesn't appear in ECG readings and is considered a grounding lead that helps minimize ECG artifacts.
|
The Modern ECG : The first electrocardiogram machine, invented by Willem Einthoven in 1903, weighed over 600 pounds. Modern ECG machines can weigh just about 8 pounds, fitting in the palm of your hand. |
Patient Positioning for 12-Lead ECG Placement
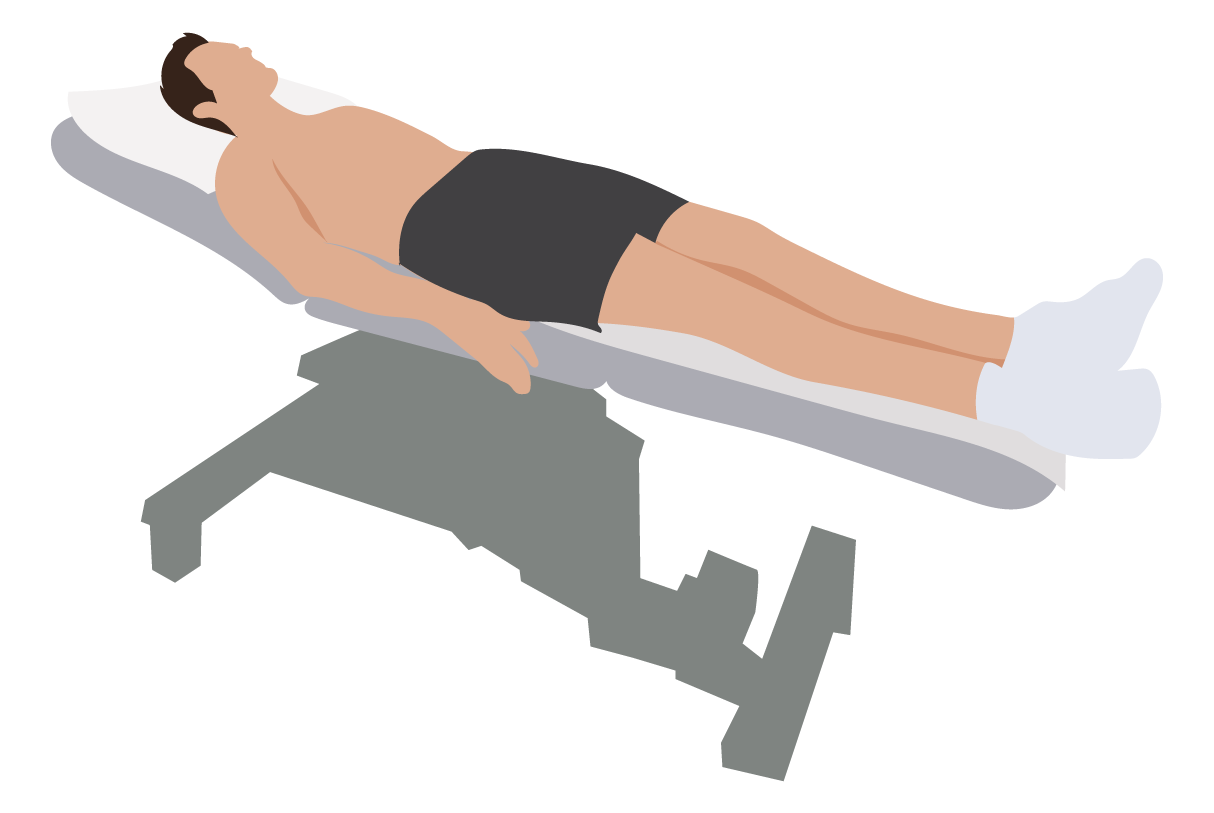
- Patient Positioning: Place the patient in a supine or Semi-Fowler's position. If both positions are impossible, you can perform an ECG with the patient in a more elevated position.
- Removal of Electronic Devices: Ensure that electronic devices, such as smartphones, are removed from the patient. These devices can produce artifacts (interferences) and cause reading problems in the ECG leads.
- Arm and Leg Positioning: With arms lying flat on the side, ask the patient to relax the shoulders and keep the legs uncrossed. This helps reduce muscle tension and movement that could interfere with the ECG machine reading.
- Adjustments for Larger Patients: For patients who do not comfortably fit on the bed or exam table due to size, ask them to cross their arms on their stomachs to reduce muscle tension and movement.
- Patient Stillness: Unless you're performing a stress ECG test, ask the patient to lie still and quietly until the test is done. Movement can cause artifacts that interfere with the accuracy of the ECG leads.
How to Reduce Significant Artifact
A slight ECG artifact is not uncommon. However, you can reduce further interference with the following tips:
- Switch off non-essential electrical devices and equipment within the vicinity if possible.
- Check for cable loops and avoid running cables adjacent to metallic objects, as they can affect the signal.
- Inspect wires and cables for cracks or breaks. Replace them when necessary.
- Use surge suppressors with the power supply if possible.
- Adjust filters and preamplifiers to minimize noise and improve signal quality.
- Ensure the patient cable is securely connected to the ECG device. Double-check for gaps between connectors.
Skin Preparation

- Skin should be dry, hairless, and oil-free. Shave hair that can possibly impede electrode placement. Electrodes should have full contact with the patient's skin.
- For better electrode adhesion and oil-free skin, rub the area with an alcohol prep pad or gauze paid with benzoin tincture.
- Reduce electrical resistance minus the skin redness with 5 to 10 gentle strokes. This will help ensure that the heart's electrical signals are transmitted to the electrodes.
- Promote an environment that prevents the patient from sweating profusely.
Electrode Application
Proper 12-lead ECG placement is crucial, particularly the exact placement of each electrode. Incorrect electrode placement can lead to false or misleading diagnosis.

- Electrode Conducting Gel: Make sure the electrode conducting gel is fresh and adequately moist. A dry electrode with inadequate gel reduces the conduction of the ECG signal.
- Electrode Storage: Electrode gel dry-out is often caused by incorrect storage. Store electrodes as instructed by the manufacturer, and do not remove them from their pouch until they're ready for use.
- Placement Considerations: Do not place electrodes on the skin over bones, incisions, irritated skin, and body parts where there is lots of possible muscle movement.
ECG Variations
While the standard 12-lead ECG is widely used, several other variants are employed in different clinical settings, including 3-lead ECG and 5-lead ECG.
- 3-Lead ECG: This uses three electrodes typically labeled white, black, and red. These colors are not universal, as two coloring standards exist for the ECG (discussed below). These three ECG leads are used for rhythm monitoring but they don’t reveal sufficient information on ST elevation activity.
-
5-Lead ECG: This uses four limb leads and one chest lead. It helps improve ST elevation readings, but it is still inferior to the comprehensiveness of the 12-lead ECG.
Outside the Field of Medicine : ECGs are used in various fields beyond medicine, such as sports science. Athletes monitor their heart rates during intense training sessions to ensure safety and optimal performance.
Color Coding Standards for the 12-Lead ECG
Currently, there are two color coding standards for 12-lead ECG:
- IEC (International Electrotechnical Commission) system
- AHA (American Heart Association) system
 If you're using AHA's system, use this mnemonic to easily recall proper 12-lead ECG placement:
- smoke over fire (black lead above the red lead)
- snow over grass (white lead above the green lead)
ECG Best Practices
- Patient Privacy Protection: Always protect the patient’s privacy and dignity by draping with a sheet to minimize exposure. This practice ensures your patient feels comfortable and respected.
- Consistency in 12-Lead ECG Placement and Patient Positioning: Lead placement and patient positioning should be the same for subsequent ECGs on any individual patient. This results in an accurate comparison of ECG results over time.
- Clinical Signs Recording: During the procedure, record any clinical signs (e.g., chest pain) in the notes or on the ECG tracing. This helps in accurate diagnosis and treatment.